Dockerfile

Dockerfile

一般来说,根据以下三步,可以将脚本命令翻译成 Dockerfile。

  1. 选择一个基础镜像。可在 Docker Hub (opens new window)中进行查找镜像。由于前端项目依赖于 Node 环境,我们选择 node:14-alpine (opens new window)作为基础镜像,其中基于轻量操作系统 alpine,内置了 node14/npm/yarn 等运行环境。
  2. 将以上几个脚本命令放在 RUN 指令中。
  3. 启动服务命令放在 CMD 指令中。

next项目

1
2
3
4
5
6
7
8
9
10
11
12
13
14
15
16
17
18
19
20
21
22
23
24
25
26
27
28
29
30
31
32
33
34
35
36
37
38
39
40
41
42
43
44
45
46
47
48
49
50
51
52
53
54
55
56
57
58
59
60
# link 2209 test

# Install dependencies only when needed
FROM node:16-alpine AS deps
# Check https://github.com/nodejs/docker-node/tree/b4117f9333da4138b03a546ec926ef50a31506c3#nodealpine to understand why libc6-compat might be needed.
RUN apk add --no-cache libc6-compat
WORKDIR /app

# Install dependencies based on the preferred package manager
COPY .npmrc package.json yarn.lock* package-lock.json* pnpm-lock.yaml* ./
RUN \
if [ -f pnpm-lock.yaml ]; then yarn global add pnpm && pnpm i; \
elif [ -f yarn.lock ]; then yarn --frozen-lockfile; \
elif [ -f package-lock.json ]; then npm ci; \
else echo "Lockfile not found." && exit 1; \
fi


# Rebuild the source code only when needed
FROM node:16-alpine AS builder
WORKDIR /app
COPY --from=deps /app/node_modules ./node_modules
COPY . .

# Next.js collects completely anonymous telemetry data about general usage.
# Learn more here: https://nextjs.org/telemetry
# Uncomment the following line in case you want to disable telemetry during the build.
# ENV NEXT_TELEMETRY_DISABLED 1
ENV NEXT_TELEMETRY_DISABLED 1
RUN yarn build

# If using npm comment out above and use below instead
# RUN npm run build

# Production image, copy all the files and run next
FROM node:16-alpine AS runner
WORKDIR /app

ENV NODE_ENV production
# Uncomment the following line in case you want to disable telemetry during runtime.
ENV NEXT_TELEMETRY_DISABLED 1

RUN addgroup --system --gid 1001 nodejs
RUN adduser --system --uid 1001 nextjs

COPY --from=builder /app/public ./public


# Automatically leverage output traces to reduce image size
# https://nextjs.org/docs/advanced-features/output-file-tracing
COPY --from=builder --chown=nextjs:nodejs /app/_next/standalone ./
COPY --from=builder --chown=nextjs:nodejs /app/_next/static ./_next/static

USER nextjs

EXPOSE 3000

ENV PORT 3000

CMD ["node", "server.js"]

构建镜像 (Image)

使用 docker build命令可以基于DockerFile 构建镜像

镜像构建成功后,我们可以将仓库上传到Docker仓库,如Docker Hub

而对于业务项目而言,一般会上传至公司内部的私有镜像仓库,比如通过 harbor (opens new window)搭建的私有镜像仓库。

1
2
3
4
5
6
7
8
9
10
11
12
13
14
# 构建一个名为 simple-app 的镜像
# -t: "name:tag" 构建镜像名称
$ docker build -t simple-app .

# git rev-parse --short HEAD: 列出当前仓库的 CommitId
# 也可将当前 Commit 作为镜像的 Tag
# 如果该前端项目使用 git tag 以及 package.json 中的 version 进行版本维护,也可将 version 作为生产环境镜像的 Tag
$ docker build -t simple-app:$(git rev-parse --short HEAD)

# 构建成功后,可用该命令列出所有的镜像
# 发现该镜像占用体积 133MB
$ docker images
REPOSITORY TAG IMAGE ID CREATED SIZE
simaple-app latest 20afeb439c58 3 minutes ago 146MB

此时构建镜像成功,通过 docker images 可知镜像体积为 133MB

运行容器

我们可以基于镜像运行 N 个容器,而本次启动的容器也是我们最终所要提供的静态服务。

1
2
3
4
5
6
7
8
9
10
# 根据该镜像运行容器
# 如果需要在后台运行则添加 -d 选项
# --rm: 当容器停止运行时,自动删除容器
# -p: 3000:3000,将容器中的 3000 端口映射到宿主机的 3000 端口,左侧端口为宿主机端口,右侧为容器端口
docker run --rm -p 3000:3000 simaple-app

# 运行成功后可在另一个窗口查看所有容器
➜ next-starter git:(next_docker) ✗ docker ps
CONTAINER ID IMAGE COMMAND CREATED STATUS PORTS NAMES
dfabb0d0a8e4 simaple-app "docker-entrypoint.s…" 4 minutes ago Up 4 minutes 0.0.0.0:3000->3000/tcp angry_chatterjee

image-20230421165934118

此时在本地访问 http://localhost:3000 访问成功

然而,通过冗余繁琐的命令行构建镜像和容器,比如管理端口,存储、环境变量等,有其天然的劣势,不易维护。

Using Docker

  1. Install Docker on your machine.
  2. Build your container: docker build -t nextjs-docker ..
  3. Run your container: docker run -p 3000:3000 nextjs-docker.

You can view your images created with docker images.

In existing projects

To add support for Docker to an existing project, just copy the Dockerfile into the root of the project and add the following to the next.config.js file:

1
2
3
4
5
// next.config.js
module.exports = {
// ... rest of the configuration.
output: 'standalone',
}

This will build the project as a standalone app inside the Docker image.

更高效的方式 docker-compose

1
2
3
4
5
6
7
8
9
10
version: '3'

services:
with-docker-multi-env-development:
build:
context: ../../
dockerfile: docker/development/Dockerfile
image: with-docker-multi-env-development
ports:
- '3001:3000'

配置结束之后,即可通过一行命令 docker-compose up 替代以前关于构建及运行容器的所有命令。

1
2
3
# up: 创建并启动容器
# --build: 每次启动容器前构建镜像
$ docker-compose up --build
1
2
3
4
5
6
7
.PHONY: build-development
build-development: ## Build the development docker image.
docker compose -f docker/development/docker-compose.yml build

.PHONY: start-development
start-development: ## Start the development docker container.
docker compose -f docker/development/docker-compose.yml up -d

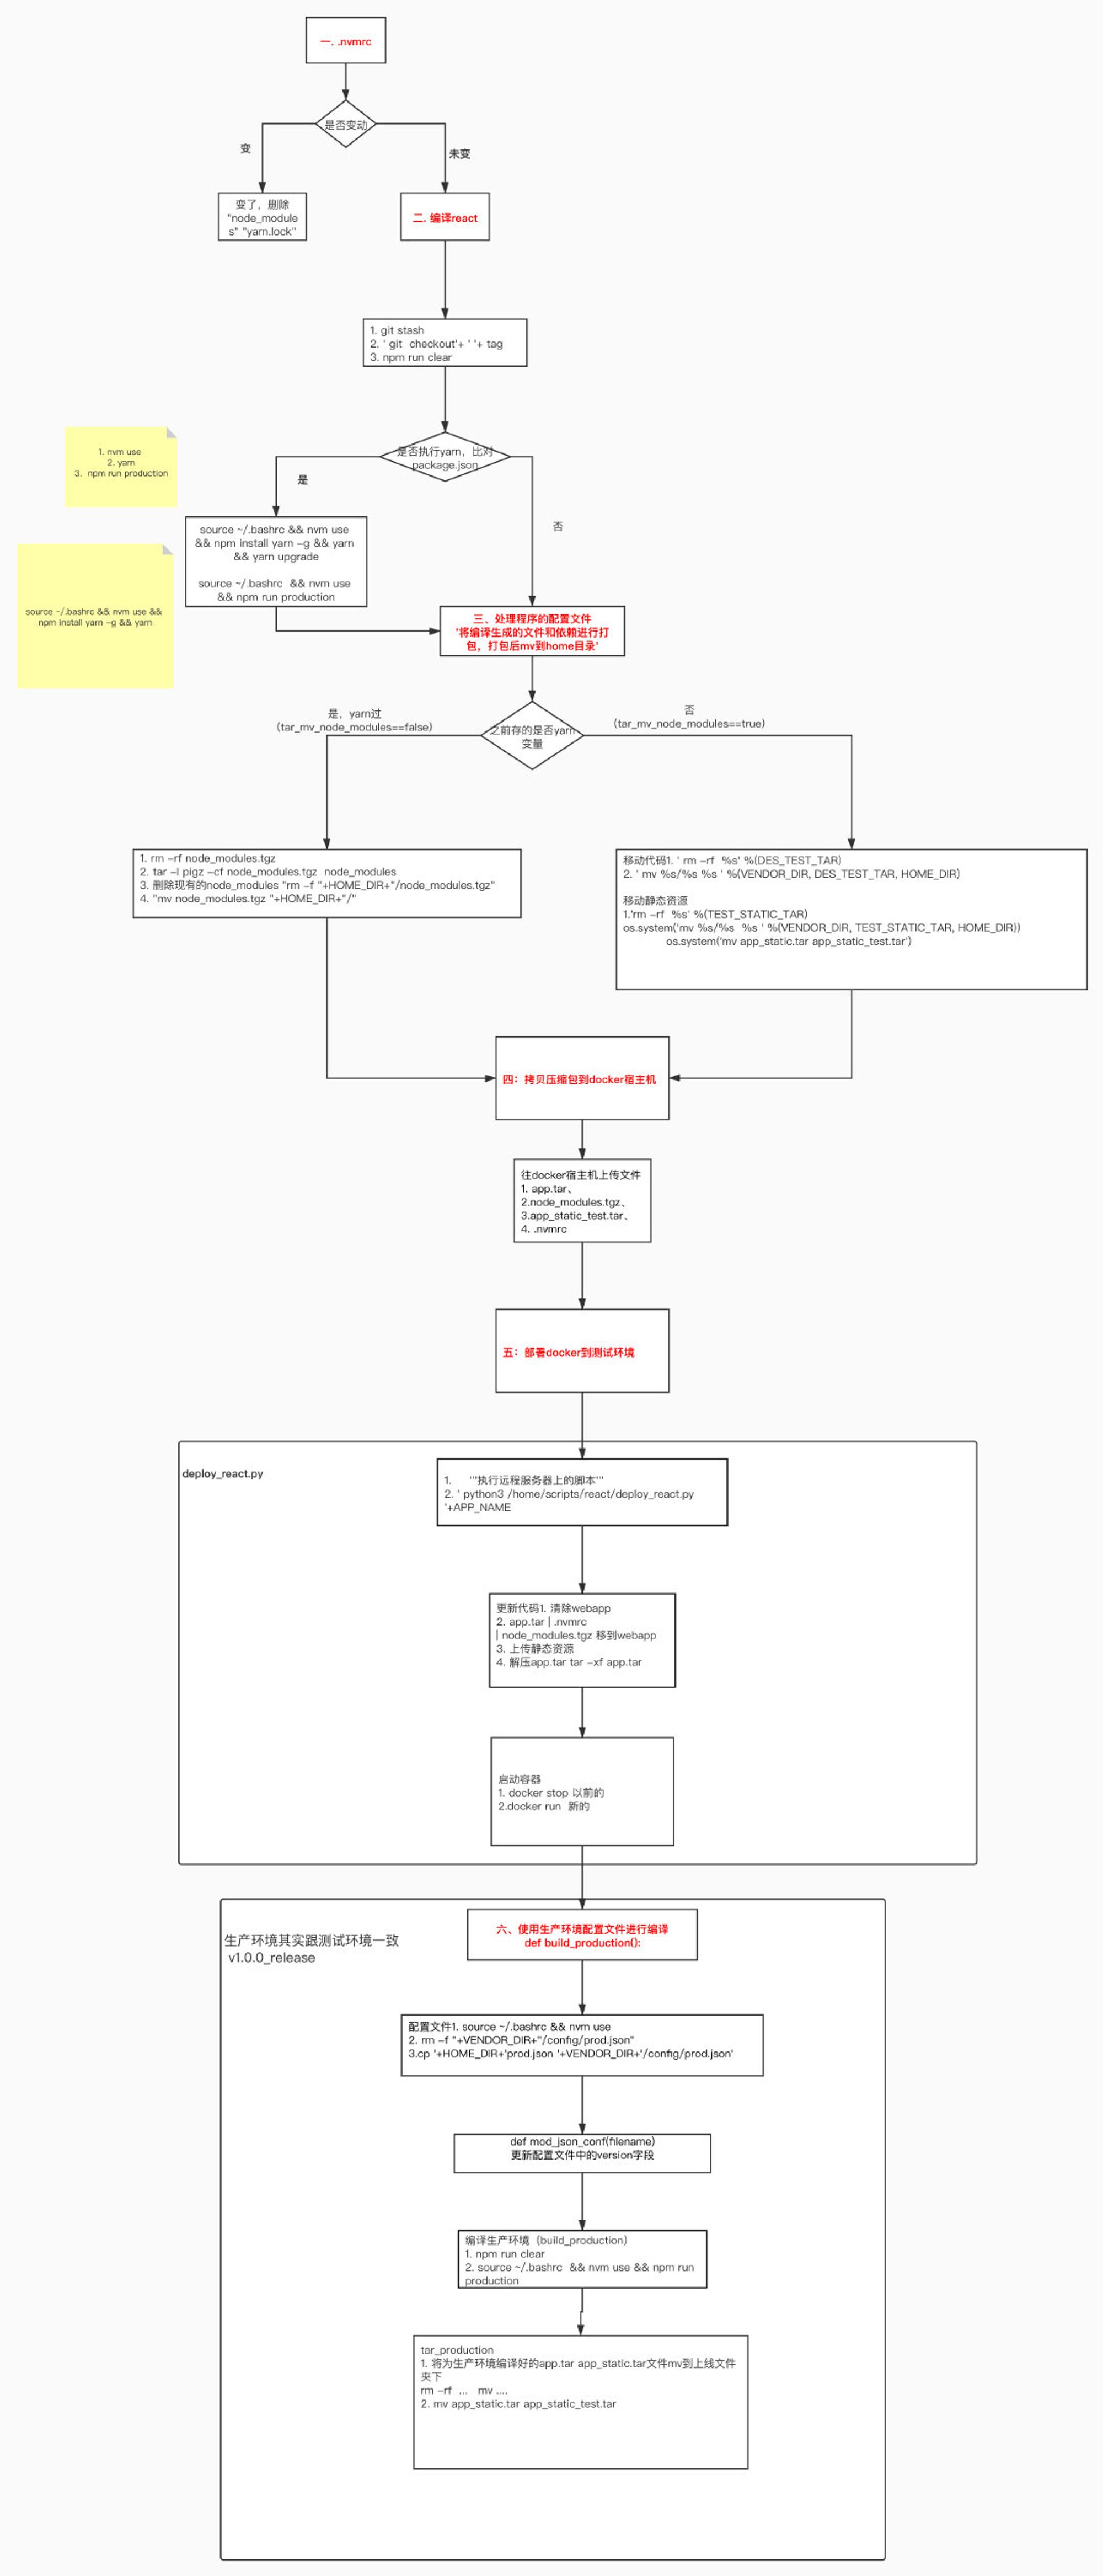
服务器原始打包编译过程:

image111

感谢你的打赏哦!